Realism, Why Bother?
Realism as a topic for artists often inspires the question: “Why bother, when we could just take a photograph?” Well, personally I appreciate art from a diverse set of genres, many of which have little to do with realism. However “suspension of disbelief” is a concept I strive for in my own work. So for me, those realistic elements are vital.
When I watch a movie, I love it when a special effect is good enough to seem plausible. Moreover, I like knowing that the potential for creating something just as convincing, sits waiting in my PC. To that end Daz Studio is an excellent free way to try your hand at 3D rendering.
For many years 3Delight was the only renderer available for Daz Studio. But with the recent arrival of alternative renderers like Lux, Octane, and now Iray, clearly more realism is in demand. What you may not know is that 3Delight possesses hidden power for creating more realistic renders. You just need to know how to take advantage of it.
So in this article, I’m going to focus on improving the look of human skin by using Gamma Correction. Bear in mind though, this really applies to just about any surface in your scene.
Note: This post is essentially a repeat of my original post in the forums at Daz3d.com. Sometimes Forum posts end up MIA, when Daz makes updates to their website. So I want to be sure everyone continues to have access to this information.
Experts Agree – Gamma Correction is Important
One important element of this hidden power is Linear Workflow, otherwise known as Gamma Correction. For some, Gamma Correction may be old news. After all, it was 2008 when Baggisbill compelled Poser users to start using GC in the forums at Renderosity and RuntimeDNA. In fact it’s origins go back further. I was able to find some documentation on the subject from circa 2001. Today the benefits of Gamma Correction in 3D rendering are as important as ever. Yet, it remains widely misunderstood and frequently discarded, even by experienced users and major industry professionals.
There are lots of reputable sources touting the importance of Gamma Correction in 3D rendering. And there are several decent explanations of how it works, though many are highly technical. Here are a few good ones:
- Pixar: Linear Workflow Color Management
- VFX Wizard: http://www.vfxwizard.com/tutorials/gamma-correction-for-linear-workflow.html
- From Shader Guru Bagginsbill, featuring his original public domain Poser Material Room recipe: http://www.renderosity.com/mod/forumpro/?thread_id=2738989
- The indispencable book “Digital Lighting & Rendering: Third Edition” (2014) by Jeremy Birn, Technical Director at Pixar, has a great chapter (#8) on Linear Workflow (thanks to PhilW for sharing this find in the Carrara forum at Daz3d.com): http://3drender.com/light/index.html
Anyway, since the technical details have been well covered elsewhere, I’d like to take a less technical approach. I’ll try to explain Gamma correction in common sense terms. I’ll show exactly how to make use of two Gamma Correction methods in DAZ Studio with 3Delight:
- Render Settings Gamma Correction
- Shader Based Gamma Correction using a Shader Mixer network.
What’s missing in a render without Gamma Correction
The three most common tell-tail signs of a render without Gamma Correction are:
1). Shadows that are entirely too dark (black).
2). Exaggerated specular burn out (a shiny spot that is too bright and often too large).
3). Color shift (a color you didn’t intend to have in the scene).
If you’ve ever worked with traditional media paints, or spent time studying color photographs and the world around you, then you may have already noticed something wrong with a lot of 3D renders. Specifically, I’m referring to the exaggerated contrast you often see, where shadows are pitch black and void of detail. Painters learn early on that you generally want to describe the shadowed part of a person or object with a darker version of the surface’s basic color, rather than black. So with a blue ball, for instance, you mix a portion of paint that is darker blue and often even more saturated in color, but rarely ever true black. Then you might use a lighter color blue for the brighter parts, and then sparingly a bit of white for the most light reflective parts.
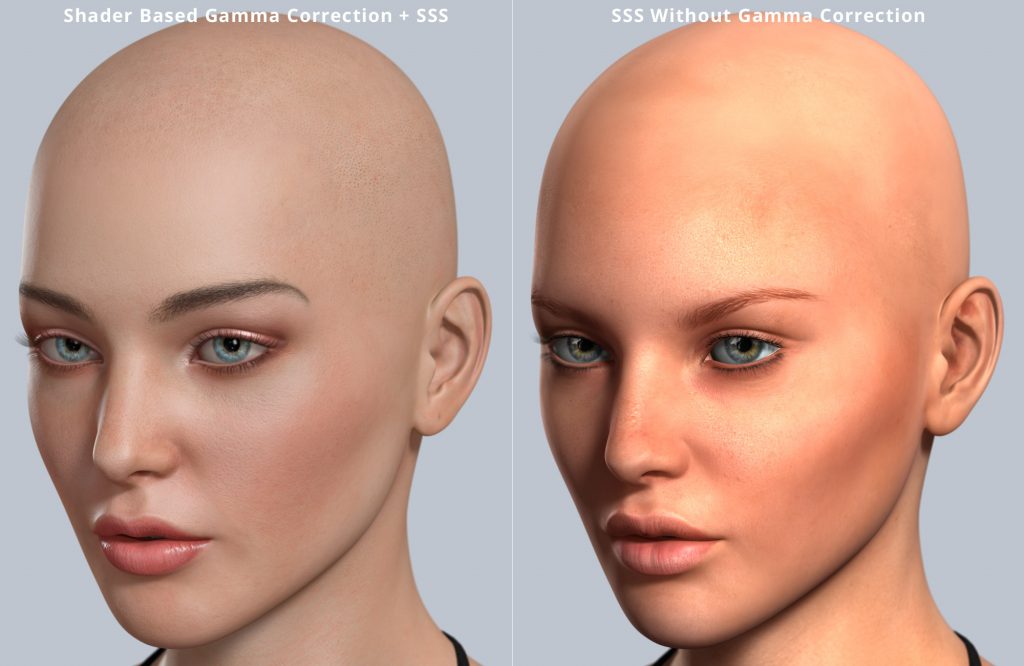
You can bring more of these transitional colors into the mix and utilize different methods of blending. But basically, what you would do to visually evaluate what looks right, is what Linear Workflow is arriving at scientifically. It’s a better way to mix your pixel paint. In any case, a side by side comparison is probably the best way to show the benefits:
Combine Gamma Correction and Subsurface Scattering
These days in DAZ Studio, since Subsurface Scattering based skin shaders are the standard, the skin may appear “waxy”, because too much SSS is being used. Without Gamma Correction it’s difficult to light human skin properly. To compensate, Daz Original characters use SSS partially for it’s primary purpose – simulating the light phenomena of translucent surfaces, and partly to make up for the lack of Gamma Correction. Therefore, when you use Gamma Correction, you can reduce SSS to physically correct levels. Often, setting SSS to half of what it was without Gamma correction is sufficient.
How to set Gamma Correction in render settings
First, without getting too technical, there are two values you should keep in mind : 2.2 and 1. For proper Gamma Correction, all color inputs (diffuse, sss color, reflection maps) get a bit of math done to them before the render using a value of 2.2. Whereas, all linear (gray-scale and black and white) inputs (bump, displacement, specular, noise, etc.) and even normal maps get a value of 1. This math gets done to color and linear inputs before they are mixed together in the render, and that’s how we get rich colors and properly colored shadows with Gamma Correction.The Main Adjustment
So now to make the magic happen: In the Render Settings tab, under Gamma, set Gamma Correction to On and Gamma to 2.2. The render engine then knows to apply a Gamma Correction value of 2.2 for the finished render. In many cases, this may be all that is needed to get the surfaces in your scene to display Gamma Correction correctly. This is because Daz Studio weights familiar properties in the right way by default. However, there are instances where the content creator may use custom surface shaders, or settings that fail to account for the proper setup for linear workflow. A common symptom is that your surfaces look really washed out (bland in color) after you turn on Gamma correction.Adjust Color Inputs If Needed
So here’s something you can do to improve things as an end user. On the Surfaces tab, find your Diffuse Color image for a given surface. You only need to do this once per image because Daz Studio applies that setting to wherever that image is used. Left click the image thumbnail, then Image Editor… and set your Image Gamma to 2.2. This tells the render engine to anti-gamma correct the input image so that it can mix correctly with light and shadow and also so it won’t be brightened twice. The default value of 0 has no real mathematical correlation. Instead it instructs the render engine to set the correct value based on the image format. Most of the time it will guess correctly, but sometimes it may not. You know better because you know color when you see it.Adjust Linear Inputs If Needed
If things in your render are still looking funky, it may also be worthwhile to use this same method on your bump, displacement, normal, specular , transparency, or other non-color image maps. The only difference is that you need to set these maps to a value of 1 rather than 2.2. Additionally, if you find that a color image map is being used for a linear property like bump or whatever, that’s not good, since Daz Studio can only apply one Gamma Correction value per image. In that case, your best option would be to open the color image in an image editor, convert it to gray-scale, and save it out with a different name. Then you can leave the original color image in Diffuse Color (for example) with its value set to 2.2 and use your new gray-scale image in the linear property with its value set to 1.How to setup shader based Gamma Correction using Shader Mixer (don’t use both)
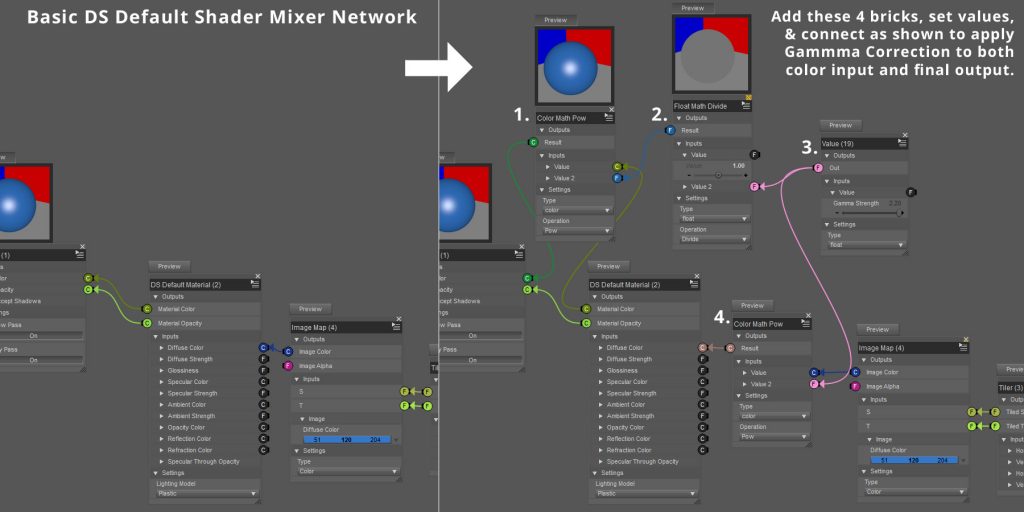
You never want gamma correction to occur twice or your images will look washed out. But if you want to apply Gamma Correction selectively to only certain surfaces in your scene, then leave the Gamma section of Render Settings at defaults (GC: Off and Gamma 1). You need to know the basics of using Shader Mixer for the next step. This example below (Figure E) is the setup used for the blue ball with Gamma Correction in Figure B above. It’s math is based on Bagginsbill’s Poser Material Room recipe, extrapolated for DAZ Studio’s Shader Mixer.Building on Gamma Correction and taking it further:
Using one of these two methods of Linear Workflow, we basically apply Anti-Gamma Correction to all color inputs. That way, they can be mixed with light (black to white grayscale) properly. Also they won’t be washed out when we apply Gamma Correction to everything at the end. The result is more color and detail in shadows as well as the brightest parts of our image. We also get colors that are truer to our inputs. For instance, in Figure B above, the prominent aquamarine specular halo (default) is almost non-existent in the Gamma Correction render.
Now that we’re using the correct amount of SSS for our translucent surfaces, we can make some other changes too. Don’t use SSS at all for opaque surfaces because it doesn’t exist that way in the real world. Once GC is doing it’s job, you won’t see a need for SSS in such surfaces. You may also discover that scenes you setup with Gamma Correction off are now too bright. But be aware that Gamma Correction renders will perform better whether your scenes are bright or dark. You will still be able to get dark shadows and saturated colors when you need them. You just need to reduce your light intensity, if you want to match previous scene values. Many consider reducing by one third to be a good approximation.
Many of the tricks and advanced techniques we used to light our scene without Gamma Correction become less necessary. In some cases, we don’t need to use them at all. But maybe this is enough to chew on for the moment. I hope this helps you get more realism out of your renders!


